Complete Guide to Night Vision Optics Technology
Our Top Picks
Affiliate disclosure: if you buy through these links, we may earn a commission at no extra cost to you.
Night vision has stopped being exotic military gear and started being a reality for serious shooters and hunters. But the technology is crowded with jargon, hype, and straight-up false claims. I've run night vision on everything from precision rifles to tactical carbines in actual darkness, competition scenarios, and field conditions—and what works on a YouTube demo doesn't always work when you need it. This guide cuts through the noise and tells you what you're actually buying, how each technology performs, and where your money delivers real capability versus marketing fluff.
The core question is simple: you need to see and shoot accurately in low light. Night vision optics solve that problem in three fundamentally different ways. Understanding which approach fits your mission—and which products actually deliver—means the difference between a functional tool and a $3,000 paperweight hanging on your rifle.
TOPDON TS004 Pro Thermal Imaging Monocular, 512 x 384 Thermal Optic
Check PriceCheck PriceA recovered top-picks entry restored from the saved product data for this article.
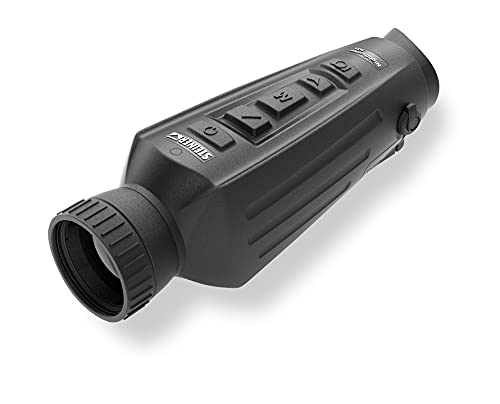
Steiner Nighthunter H35 Thermal Optic Handheld Scope with Quantum Vision Technology
Check PriceCheck PriceA recovered top-picks entry restored from the saved product data for this article.

AGM Global Vision Rattler Thermal Imaging Rifle Scope
Check PriceCheck PriceA recovered top-picks entry restored from the saved product data for this article.
Table of Contents
The Three Core Technologies: Image Intensification vs. Thermal vs. Digital
Before we talk product, understand the physics. Image intensification (also called image intensifier tubes or I²) amplifies existing light—starlight, moonlight, artificial illumination—and makes it visible to your eye. Thermal imaging doesn't care about light at all; it detects heat radiation in the infrared spectrum and converts it to a visible image. Digital night vision uses a conventional sensor (like those in smartphones) with infrared illumination and computational processing to create a viewable image. Each one has a different job, different strengths, and fundamentally different limitations.
The military has used image intensification for 60 years because it works reliably and provides a true sight picture through magnified optics—critical for precision shooting. Thermal has become dominant in recent years because it works in any lighting condition and penetrates obscuration like fog and smoke. Digital is the newcomer, sitting between the two in capability and cost. None of them is universally "best." Your mission determines which technology makes sense, and I've watched shooters waste serious money buying the wrong one because they confused capability with necessity.
Image Intensification: The Traditional Standard
Image intensification technology hasn't fundamentally changed in decades, which is both good and bad. The good: it's proven, reliable, and provides a natural magnified sight picture that most shooters understand immediately. The bad: it absolutely requires ambient light. A completely dark night with no moon and heavy cloud cover will leave you nearly blind, even with a high-end tube. This is the single most important limitation, and I've seen hunters and tactical operators discover this the hard way at the moment they needed to perform.
Modern I² tubes are classified by generation: Gen 2, Gen 3, and the newest Gen 3 Autogated tubes. Gen 2 tubes are affordable ($2,000-$4,000 for a complete monocular) and functional in good moon and starlight conditions. Gen 3 offers better light amplification, cleaner images, and longer battery life; expect $4,000-$8,000. Gen 3 Autogated tubes (like the PVS-14 or comparable commercial units) actively adjust to prevent "blooming"—that blown-out halo effect when bright light sources appear in your field of view. They cost more ($6,000-$12,000+) but perform measurably better in mixed-light environments like patrolled areas with distant streetlights or vehicle headlights.
The critical spec is gain: how much the tube amplifies ambient light. Higher gain sounds better until you realize that high gain also amplifies all that useless noise and can make the image grainy. Mid-range gain (around 20,000 to 30,000) typically gives the cleanest image with the most information. But here's what manufacturers don't emphasize: the quality of the image intensifier tube itself—the photocathode and microchannel plate—matters more than the gain number. A quality Gen 3 tube at moderate gain will beat a cheap Gen 3 tube with max gain every single time. I've shot both on the same rifle at the same time, and it's not even close.
Image intensifier tubes can be mounted as clip-on units in front of your existing day-time rifle scope (turning it into a day/night capable system), as dedicated night vision scopes, or as standalone monoculars mounted on the rifle rail. The clip-on approach is popular because it preserves your day scope and reticle focus—but it adds parallax error and shifts your point of impact compared to shooting the day scope alone. Dedicated night vision scopes solve this but lock you into nighttime-only capability. Most serious operators run a hybrid: quality day scope on the rifle, with a clip-on unit or separate night vision rifle mounted in tandem. This is more expensive but functionally superior.
Thermal Optics: Seeing Heat, Not Light
Thermal imaging changed the game because it works when image intensification fails. Complete darkness, heavy fog, smoke, dense brush—thermal doesn't care. It detects infrared radiation (heat) and renders it as a visible image, typically with hot objects appearing white or red and cool objects appearing dark. This is enormous for hunting (animals show up clearly against cooler backgrounds), tactical work (detecting people), and searching (finding warm targets). But—and this matters—thermal requires that your target is warmer or cooler than its background. Shoot a perfectly camouflaged shooter against a sun-warmed hillside in late afternoon? Thermal might struggle. Shoot the same target against a cool sky or through thick vegetation? Thermal will locate them before they know you're looking.
Thermal scopes and monoculars use microbolometer arrays (sensor technology) that detect heat wavelengths and convert them to digital images. The core specs are thermal sensitivity (how small a temperature difference the sensor can detect), resolution (usually 640×480, 320×256, or lower), and refresh rate. Higher resolution and higher sensitivity both cost more money, both improve target identification at distance, and both matter more than the marketing hype suggests. A 640×480 thermal scope will identify a human target at 500+ yards in complete darkness. A 320×256 scope requires 200-300 yards for the same confidence. This isn't academic—it's the difference between seeing a threat and engaging it or having to close distance and lose the advantage.
The other critical spec is the thermal core itself: uncooled vs. cooled sensors. Uncooled microbolometers are cheaper ($3,000-$8,000 for a complete scope) and don't require active cooling systems or warm-up time. They're also slightly less sensitive than cooled sensors and more affected by ambient temperature changes. Cooled thermal cores (like those in premium Flir and military-grade systems) are brutally expensive ($15,000-$40,000+), require warm-up time, and drain batteries faster—but they deliver superior sensitivity and performance in hot environments where uncooled sensors lose contrast. For most civilian shooters and hunters, uncooled thermal is the practical choice. Military and professional tactical users gravitate toward cooled because the performance edge justifies the cost and weight.
Mounting thermal optics on a rifle presents different challenges than image intensification. Because thermal displays are digital, you're looking at a screen, not through optical glass to natural scenery. This takes adjustment if you're coming from conventional scopes. The reticle is software-defined, so you can change it—but you're reliant on battery life and software reliability. Thermal scopes also require zeroing and have their own point-of-impact that differs from your day scope. Most tactical shooters run thermal as a standalone system on a separate rifle or in a fast-switch QD mount arrangement. Hunters often run thermal as their primary nighttime/low-light tool and prefer dedicated thermal scopes with good magnification range (typically 2-8x or 3-12x) and clean sight pictures.
Digital Night Vision and Hybrid Systems
Digital night vision is newer technology that's improving rapidly. These systems use conventional digital sensors (similar to security camera technology) with integrated infrared illuminators and computational processing. The sensor captures the IR-illuminated scene and the system renders it as a visible image. The appeal is cost (typically $2,000-$6,000 for a complete system) and performance that sits between image intensification and thermal: they work in complete darkness (because of the IR illuminator), don't require ambient light, and deliver a more natural sight picture than thermal because the image more closely resembles conventional vision. They also don't require batteries as aggressively as thermal cooled systems.
The problem is active illumination. That IR illuminator that allows you to see in darkness also broadcasts your position to anyone wearing night vision. In truly tactical scenarios, this is a serious weakness. For hunting nocturnal predators or hogs, where concealment matters less, digital night vision is effective and affordable. Some newer systems incorporate switchable IR illuminators (on/off selectable) and passive operation mode, which improves tactical utility—but you sacrifice the no-ambient-light capability. I've used solid digital night vision systems in field conditions and they deliver genuine capability for the price. The reticle is digital and customizable (a genuine advantage), and the sight picture is intuitive if you're accustomed to conventional shooting.
Hybrid systems—combining both thermal and digital I² capabilities in one unit—are emerging from premium manufacturers. These are the future of professional-grade night optics, but they're currently expensive ($8,000-$25,000+) and still refining reliability. For the average shooter or hunter, a hybrid doesn't make financial sense yet. Buy a specialized tool (thermal or image intensification) that directly matches your mission instead of paying premium prices for features you won't use.
Choosing Between Night Vision and Thermal for Your Rifle
This decision breaks down into three realistic scenarios. First: you're hunting or doing precision work at distance in darkness where target identification and clean sight picture matter more than penetrating obstacles. Image intensification wins. You get true magnification, a natural reticle focus, and reliable performance in decent starlight or moonlight. The limitation is you need ambient light—but for most hunting applications in areas with moonlight and starlight, this is manageable. Second scenario: you need to detect and engage targets through smoke, fog, brush, or in absolute darkness. Thermal wins unambiguously
Frequently Asked Questions
What is the best night vision optic for hunting?
The best night vision optic for hunting depends on your needs, but thermal optics are often preferred for detecting heat signatures in complete darkness. Image intensification scopes are also popular for low-light environments.
How do I choose between thermal and image intensification optics?
Thermal optics detect heat and work in complete darkness, while image intensification scopes amplify existing light. Choose thermal for total darkness and image intensification for low-light conditions.
Is thermal optics worth the investment for a shooter?
Thermal optics are worth the investment if you need reliable performance in total darkness, but they are more expensive and may have limitations in extreme weather conditions.
How do I maintain my night vision scope for optimal performance?
Clean the lenses regularly with a microfiber cloth and lens cleaner. Store the scope in a dry, cool place and avoid exposing it to extreme temperatures or moisture.
What is the best magnification for a rifle scope in low light?
A magnification range of 3-9x is generally best for low-light conditions. Higher magnification can reduce light gathering, making it harder to see in dim environments.
How do I know if a night vision optic is genuine or counterfeit?
Check for brand authenticity, warranty details, and certifications. Genuine products will have clear branding, serial numbers, and come with proper packaging and support.
What is the best way to use a red dot sight at night?
Use a red dot sight with a low brightness setting for night use. Ensure the lens is clean and the sight is properly aligned for quick target acquisition in low-light conditions.

1. TOPDON TS004 Pro Thermal Imaging Monocular, 512 x 384 Thermal Optic
Relevant product pick selected from local vetted product data; verify current pricing and availability before buying.
2. Steiner Nighthunter H35 Thermal Optic Handheld Scope with Quantum Vision Technology
Relevant product pick selected from local vetted product data; verify current pricing and availability before buying.
3. AGM Global Vision Rattler Thermal Imaging Rifle Scope
Relevant product pick selected from local vetted product data; verify current pricing and availability before buying.